kostenpflichtige
Antivirensoftware
für Arktur 4
Mittlerweile sind von allen Herstellern
von Antivirensoftware auch Linux-Versionen erschienen. Einige
Hersteller beiten auch Campus-Lizenzen an, in denen dann die
Serverversionen für alle Serverbetriebssysteme (von Netware über
Windows bis Linux) u.U. auch gleich mit Mail-Sannern u.s.w.
enthalten sind. Man erhält hier meist einen Telefon- und Mail-Support,
meist tägliche Signaturaktualisierungen und meist auch einen
Virenwächter - kurz ein rundum-sorglos-Paket.
Die Preise unterscheiden sich je nach
Anbieter und Umfang des Softwarepaketes und der Lizenzen.
Für unsere Zwecke dürfte auch eine
sogenannte "Workstation"-Version reichen, denn die enthält immer den
Komandozeilenscanner.
Leider bieten nicht alle Hersteller Testversionen
zum Download
an.
Bisher habe ich folgende Versionen getestet:
 - habe ich
mit Arktur 4 zum Laufen bekommen
- habe ich
mit Arktur 4 zum Laufen bekommen  - habe ich
nicht / nicht vollständig zum Laufen bekommen (ohne) - ungetestet
- habe ich
nicht / nicht vollständig zum Laufen bekommen (ohne) - ungetestet
Die jeweiligen Kommandozeilenscanner kann man nachts
per
Eintrag in der crontab laufen lassen.
F-Prot
F-Prot von FRISK-Software
oder deren deutschen Vertertung, dem perComp-Verlag
GmbH kann
sehr einfach auf Arktur installiert werden. Testversionen können Sie
sich beim Hersteller herunterladen. Diese sind 30 Tage lauffähig. Der
perComp-Verlag bietet Rabatte für staatlich anerkannte
Bildungseinrichtungen. Für Home-User gibt es die Lizenz gratis!
FRISK hat auch eine gute englische
Dokumentation für die
File-Server-Version.
Ich habe mir fp-linux-ws-4.4.2.tar.gz
aus der Home-User-Sektion
heruntergeaden (im Corporate-Bereich habe ich keinen
Testversionsdownload gefunden), diese Datei nach
T: kopiert.
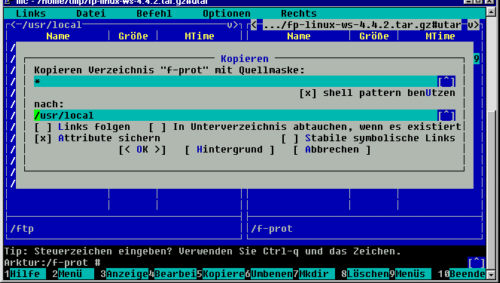
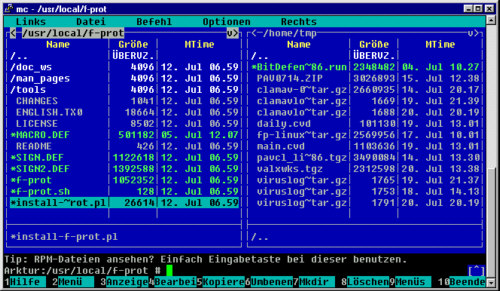
Als ROOT nimmt man den MC und geht nach /home/tmp,dort öffnet man
die Datei (Balken drauf und ENTER) und kopiert das Verzeichnis f-prot
nach /usr/local (sonst
bekommt man beim Start einen entsprechenden Hinweis).
Man wechselt in das kopierte Verzeichnis und startet install-f-prot.pl
mit der Enter-Taste.
Nun geht die Installation los: (Man drückt bei den 3
Fragen einfach immer Enter)
Arktur:/usr/local/f-prot
# ./install-f-prot.pl
(c) FRISK Software International
http://www.f-prot.com/
F - Prot Antivirus - workstation - for Unix.
######################################################
# You are starting the
configuration part of the: #
# F -
Prot Antivirus
installation.
#
######################################################
Where do you want a symbolic link
for F - Prot Antivirus to be generated?
[/usr/local/bin/] : Enter
Where do you want the symbolic
links for section 8 manuals to be generated (man8)?
[/usr/local/man/man8/] : Enter
Where do you want the symbolic
links for the manuals for executable programs to be generated (man1)?
[/usr/local/man/man1/] : Enter
######################################################
# You are starting the file-check
part of the: #
# F -
Prot Antivirus
installation.
#
######################################################
Checking file:
'/usr/local/f-prot/f-prot': OK.
Checking file:
'/usr/local/f-prot/man_pages/f-prot.1': OK.
Checking file:
'/usr/local/f-prot/man_pages/check-updates.pl.8': OK.
######################################################
# You are starting the
installation part of the: #
# F -
Prot Antivirus
installation.
#
######################################################
Setting up symbolic link:
/usr/local/bin/f-prot:
(symbolic link already exists) Continuing...
Setting up symbolic link:
/usr/local/man/man8/check-updates.pl.8:
(symbolic link already exists) Continuing...
Setting up symbolic link:
/usr/local/man/man1/f-prot.1:
(symbolic link already exists) Continuing...
Changing file permissions:
File permissions:
/usr/local/f-prot/f-prot rwxr-x-r-x OK.
File permissions:
/usr/local/f-prot/tools/check-updates.pl rwx------ OK.
######################################################
# Installation of F - Prot
Antivirus is completed. #
######################################################
Arktur:/usr/local/f-prot #
Hilfe
bekommt man mit man f-prot ! (f-prot --help geht nicht!)
Man kann nun sofort scannen:
Arktur:/ # f-prot -ai -archive
/home/virus
Virus scanning report
- 21 July 2004 @ 15:22
F-PROT ANTIVIRUS
Program version: 4.4.2
Engine version: 3.14.11
VIRUS SIGNATURE FILES
SIGN.DEF created 8 July 2004
SIGN2.DEF created 8 July 2004
MACRO.DEF created 5 July 2004
Arktur:/ # f-prot -ai -archive
/home/virus
Virus scanning report
- 21 July 2004 @ 15:23
F-PROT ANTIVIRUS
Program version: 4.4.2
Engine version: 3.14.11
VIRUS SIGNATURE FILES
SIGN.DEF created 8 July 2004
SIGN2.DEF created 8 July 2004
MACRO.DEF created 5 July 2004
Search: /home/virus
Action: Report only
Files: "Dumb" scan of all files
Switches: -ARCHIVE -PACKED
-SERVER -AI
/home/virus/vacsina.com
Infection: Vacsina.1206.A
/home/virus/yankee.exe
Infection: Yankee_Doodle.2881.A
/home/virus/attrinf.exe
Infection: Tequila.2468.A
/home/virus/tequila.com
Infection: Tequila.2468.A
Results of virus scanning:
Files: 8
MBRs: 0
Boot sectors: 0
Objects scanned: 8
Infected: 4
Suspicious: 0
Disinfected: 0
Deleted: 0
Renamed: 0
Time: 0:00
Arktur:/ #
Ein Update bekommt man mit dem Script
/usr/local/f-prot/tools/check-updates.pl - in diesem Script ist auch
beschrieben, wie man es in der crontab aufrufen kann.
Man kann sich aber auch die Virensignaturen von
F-Prot herunterladen und manuell einbinden. Dazu kopiert man MACRO.DEF,
SIGN.DEF und SIGN2.DEF nach /usr/local/f-prot.
Zusammenfassung:
Aufruf:
Hilfe:
Programm:
Siganturen:
Update:
|
f-prot [optionen] [pfad]
man f-prot
/usr/local/f-prot
/usr/local/f-prot
/usr/local/f-prot/tools/check-updates.pl
|
Bitedefender
Man läd sich BitDefender-samba-1.5.6-1.linux-gcc3x.i586.tar.run
(oder neuer) herunter und kopiert die Datei nach T:
Als ROOT nimmt man den MC und geht nach /home/tmp.
Dort setzt man den Balken auf die Datei und mit F9 - Datei - Chmod
setzt man sie auf ausführbar (ich habs für mich gemacht).
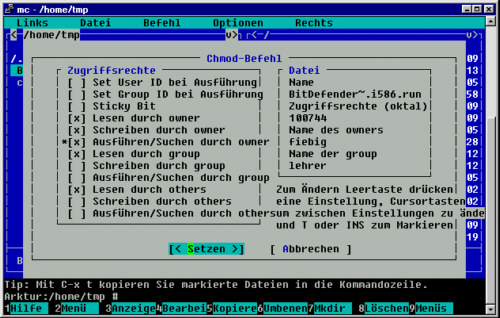
Nun braucht man nur
noch Enter zu drücken und bitdefender installiert sich.
Den Lizenzvertrag
bestätigt man dann mit accept:
...
Please enter "accept" if you
agree to the License Agreement.
Enter anything else if you don't
agree
to the terms in the License Agreement.
The installation process will
stop.
accept
Es folgen noch zwei
Fragen, dann ist man fertig:
Installation directory [/opt]:
Lib directory [/usr/lib]:
No previous BitDefender-engines
installation found. We will install.
No previous BitDefender-core
installation found. We will install.
No previous BitDefender-samba
installation found. We will install.
Installation will begin. Please
note that upgrading will overwrite
some of your files. Please backup
before continuing.
Press Enter to continue. Enter
Unpacking BitDefender-engines ... Done.
Unpacking BitDefender-core ... Done.
Unpacking BitDefender-samba ... Done.
bd
0:off 1:off 2:off
3:on 4:off 5:on 6:off
Sorry, user root is not allowed to
execute '/opt/BitDefender/bin/bdregd start
/opt/BitDefender/etc/bdsettings.xml' as bitdefender on Arktur.
Wechselt man seine
Idendität: su -l bitdefender, dann kann man dieses Kommando leider auch
nicht manuell ausführen. Die anderen folgenden Kommandos mit diesem
Fehler aber schon. Bitdefender legt den user "bitdefender" während der
Installation an, aber scheint ihn nicht zu benutzen.
Beim Sytemstart habe
ich aber trotzdem immer wieder diese Fehlermeldungen.
Sicher kann ein
Linux-Freak hier noch was richten, aber für ein Bezahlprogramm ist es
nicht optimal installierbar. Vielleicht gibt das Handbuch noch etwas
her.
Ich gebe hier aber auf.
Aufruf:
Hilfe:
Programm:
Siganturen:
Update:
|
|
Panda-Antivirus
Man läßt sich die Evaluations-CD von
Panda-Antivirus
Deutschland schicken und kopiert die
Datei pavcl_7.0-1.i386.tgz aus dem Unterverzeichnis
\Product\Pavcl\Linux nach T:.
Als ROOT kopiert man pavcl_7.0-1.i386.tgz in das Wurzelverzeichnis /.
Dort gibt man gzip -d pavcl_7.0-1.i386.tgz ein
Es entsteht pavcl_7.0-1.i386.tar
Und für die Installation gibt man tar -xvf pavcl_7.0-1.i386.tar
ein.
Arktur:/ # gzip -d
pavcl_7.0-1.i386.tgz
Arktur:/ # tar
-xvf pavcl_7.0-1.i386.tar
usr/bin/pavcl
usr/lib/libpavdll.so.3.6.0.1
usr/lib/libpavdll.so
usr/lib/panda/pav.sig
usr/lib/panda/PANDA.CHP
etc/panda/pavcl/pavcl.sav
var/log/panda/pavcl.log
var/log/panda/pavcl.rpt
usr/man/man1/pavcl.1.gz
usr/man/es/man1/pavcl.1.gz
usr/share/locale/es/LC_MESSAGES/pavcl.mo
Arktur:/ #
Mit pavcl /home -aut -heu -cmp kann es
losgehen:
(-aut dient dazu, die Lizenzerklärung nicht durchzuscrollen und
immer
wieder bestätigen zu müssen)
Arktur:/ # pavcl
/home -aut -heu -cmp
Panda
Antivirus Linux, Copyright 1989-2003 (c) Panda Software
Time employed
for scan .............: 00:00:29
Number of
files scanned ............: 534
Number of
files infected ...........: 0
Copyright Panda Software
Für Fragen steht der Panda Corporate Antivirus tech. Support unter
02065 / 961 - 444 zur Verfügung.
Zur Nutzung aller Serviceleistungen ist
eine Registrierung der Test-Vollversion (für alle unterstützten
Betriebssysteme - Linux, Windows - Netware) für 30 Tage kostenlos. Man
erhält einen Aktivierungsschlüssel und kann dann online, per FAX oder
per Mail die Zugangsdaten zur Panda-Aktualisierungsseite, dem tech.
Support und dem SOS-Viren-Service abfordern.
Panda bietet aber nur einen
Kommandozeilenscanner für Linux an.
Aufruf:
Hilfe:
Programm:
Siganturen:
Update:
|
pavcl [pfad] [optionen]
pavcl -help
/usr/bin
/usr/lib/panda
per Zugangsdaten auf der Panda-Webseite
|
Hat man ein Updatefile geladen, so
braucht man pav.zip (pavmmdd.zip)
nur zu entpacken und die Datei PAV.SIG
als pav.sig nach
/usr/lib/panda zu kopieren!
Die Virensignatur der Freewareversion (02/2004) war neuer als die auf
der Evaluations-CD (06/2003), aber man erhält ja einen Zugang zum
Aktualisieren.
Norman
Man läd sich
nvc-5.70.04.tgz
(oder neuer) herunter und kopiert
die Datei nach T:
Als ROOT nimmt man den MC und geht nach /home/tmp und verschiebt die
Datei in die Wurzel.
Nun folgen folgende Befehle:
tar xvzfp ./nvcc-x.xx-x.tgz
/opt/norman/nvc/bin/install.sh
Es folgt:
opt/norman/
...
opt/norman/nvc/bin/libnptbin.so
NORMAN Tgz post installations script
This program will complete the .tgz installation of NVC.
On rpm or deb based distributions this script is redundant.
Press enter to continue
Enter
creating symlink to niu in /usr/bin
...
creating symlink to libnptndesk.so in /usr/lib
installation complete
Arktur:/ #
Mit nvcc --help erhält man eine Befehlsübersicht.
und schon kann man scannen:
Arktur:/usr # nvcc /home/virus -c
-s -u
NORMAN
Norman Virus Control Version
5.70.01 Jun 15 2004 10:37:11
Copyright (c) 1993-2003 Norman ASA
NSE revision 5.70.14
nvcbin.def revision 5.70 of
2004/07/01 (57042 variants)
nvcmacro.def revision 5.70 of
2004/07/01 (9768 variants)
Total number of variants: 66810
Logging to
'/opt/norman/logs/nvc00002.log'
Possible virus in
'/home/virus/attrinf.exe' -> 'Tequila.2468-2494'
Possible virus in
'/home/virus/attrinf.~xe' -> 'Tequila.2468-2494'
Possible virus in
'/home/virus/tequila.com' -> 'Tequila.2468-2494'
Possible virus in
'/home/virus/tequila.vir' -> 'Tequila.2468-2494'
Possible virus in
'/home/virus/vacsina.com' -> 'Vacsina.TP.05.A-C'
Possible virus in
'/home/virus/vacsina.vir' -> 'Vacsina.TP.05.A-C'
Possible virus in
'/home/virus/yankee.exe' -> 'Yankee_Doodle.TP-44.A-E.2881'
Possible virus in
'/home/virus/yankee.vir' -> 'Yankee_Doodle.TP-44.A-E.2881'
8 possible infections found.
0 archives unpacked, 15 files
found.
15 files, 47 kbytes scanned.
Total scanning time: 0 min. 00
secs.
47 kbytes per second.
Arktur:/usr #
Norman befindet sich in /opt//Norman und enthält:
nvcoa - On-access scanner
nvcc - Command line scanner
niucf - Internet Update Configuration
nvccf - Main configuration tool
niu - Internet Update
Einen Hilfetext findet man in /opt/norman/nvc/info. Das
Konfigurationstool funktioniert mangels der nicht auffindbaren Java
Virtual Machine nicht. Der Versuch den On-access-Scanner zu starten
endet mit:
Logging to '/opt/norman/logs/nvc00002.log'
Arktur:/opt/norman/nvc # nvcoa
dazuko must be loaded for this program to work.
See http://www.dazuko.org for more information
Could not initialize program.
Arktur:/opt/norman/nvc #
Andere Programme starten dazuko selber! Sicher wissen die Freaks, wie
man Datzuko startet, er liegt auf Arktur 4 vor. Das Modul dazuko.o
befindet sich unter /lib/modules/2.4.26/misc.
Aufruf:
Hilfe:
Programm:
Siganturen:
Update
|
nvcc [Pfad] [Optionen]
nvcc --help
/opt/norman/nvc/bin
/opt/norman/nvc/nse
niu -y
|
Antivir/Vexira
Meine persönliche Nummer eins - aber auch entsprechend teuer!
Leider hat mir CentralCommand noch keinen Exaluationskey geschickt. Bei
dieser Firma ist valxsrv.tgz und valxwks.tgz anscheinend identisch
(Server- und Workstationversion), aber natürlich kostet die
Serverversion 10x soviel, wie die Workstationversion.
Die Serverversion von CentralCommand entspricht (bis auf einige wenige
Dateinamen) der Serverversion avlxsrv.tgz.tar von Antivir von H+BEDV
Datentechnik GmbH. Beide Firmen kooperieren. Testversionen können
Sie sich auf den entsprechenden Seiten (http://www.antivir.de
oder http://www.centralcommand.com)
laden. Per E-Mail
können Sie einen
30 Tage Evaluationskey zum Testen beantragen.
CentralCommand bietet gute Schulpreise
für die Windowsversionen und Antivir bietet für Schulen Campus-Lizenzen
(für alle Server und Rechner) an.
Ich werde hier die Installation der Serverversion von Antivir kurz
darstellen:
Nachdem man wiederum die oben genannte Datei auf T. kopiert hat,
kopiert man mit dem MC das im Archiv enthaltene Verzeichnis in die
Wurzel. Es folgt nach einem Wechsel in dieses Verzeichnis:
Arktur:/antivir-server-2.1.1 #
./install
Starting AntiVir for UNIX Server
2.1.1 installation...
die vollständigen
Meldungen und die 14 Fragen zur Installation finden Sie hier!
Here are some
commands that you should remember...
AvGuard
=======
configure:
/usr/lib/AntiVir/configavguard
start:
/usr/lib/AntiVir/avguard start
stop:
/usr/lib/AntiVir/avguard stop
check:
/usr/lib/AntiVir/avguard status
Automatic
Internet Updater
==========================
start:
/usr/lib/AntiVir/avupdater start
stop:
/usr/lib/AntiVir/avupdater stop
check:
/usr/lib/AntiVir/avupdater status
...
If you have
any license key files, please copy them to /usr/lib/AntiVir
before running
the software. Without a valid license key, it will
run in DEMO mode.
Arktur:/antivir-server-2.1.1 #
Hat man es gekauft, bzw. den Evaluationskey erhalten, kopiert man die
in server.zip enthaltenen Dateien von T: (/home/tmp) nach
/usr/lib/AntiVir
Den Erfolg kann man kontrollieren mit:
Arktur:/ # antivir --version
6.26.0.3
operating system: Linux (glibc
2.2)
product version: 2.1.1-0
engine version:
6.26.0.3
packlib version: 2.0.3.12
(supports 24 formats)
vdf
version: 6.26.0.3
Warning: the file "antivir.vdf"
is more than 14 days old
product:
AntiVir Server
key
file: HBEDV.KEY
registered user:
Evaluationslizenz (Server)
serial number:
0000149999
key
expires: 6 Aug 2004
run
mode: COMMERCIAL
product:
AntiVir Workstation
key
file: HBEDV.KEY
registered user:
Evaluationslizenz (Server)
serial number:
0000149999
key
expires: 6 Aug 2004
run
mode: COMMERCIAL
product:
AntiVir (command line scanner)
key
file: HBEDV.KEY
registered user:
Evaluationslizenz (Server)
serial number:
0000149999
key
expires: 6 Aug 2004
run
mode: COMMERCIAL
Arktur:/ #
Scannen kann man nun auch:
Arktur:/ # antivir -s -z
/home/virus
AntiVir / Linux Version 2.1.1-0
Copyright (c) 1994-2004 by H+BEDV
Datentechnik GmbH.
All rights reserved.
Loading
/usr/lib/AntiVir/antivir.vdf ...
Warnung: Die Datei "antivir.vdf"
ist älter als 14 Tage.
VDF-Version: 6.26.0.3 vom 15 Jun
2004
AntiVir-Lizenz: 149999 für
Evaluationslizenz (Server)
Prüfe Laufwerk/Pfad (list):
/home/virus
/home/virus/stoned.com
Datum: 21.07.2004
Zeit: 16:02:54 Größe: 512
ALERT: [Stoned #2 virus]
/home/virus/stoned.com <<< Contains code of the Stoned #2 virus
/home/virus/vacsina.com
Datum: 21.07.2004
Zeit: 16:02:54 Größe: 7542
ALERT: [Vacsina-Exe2Com
virus] /home/virus/vacsina.com <<< Contains code of the
Vacsina-Exe2Com virus
/home/virus/yankee.exe
Datum: 21.07.2004
Zeit: 16:02:54 Größe: 3893
ALERT: [Yankee #6 virus]
/home/virus/yankee.exe <<< Contains code of the Yankee #6 virus
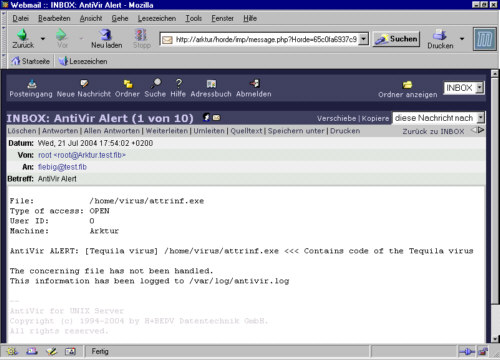
/home/virus/attrinf.exe
Datum: 21.07.2004
Zeit: 16:02:54 Größe: 3066
ALERT: [Tequila virus]
/home/virus/attrinf.exe <<< Contains code of the Tequila virus
/home/virus/tequila.com
Datum: 10.11.1991
Zeit: 17:56:02 Größe: 3066
ALERT: [Tequila virus]
/home/virus/tequila.com <<< Contains code of the Tequila virus
----- Suchergebnisse -----
Verzeichnisse:
1
Dateien: 7
Alarme: 5
Verdächtig: 0
Repariert: 0
Gelöscht: 0
Umbenannt: 0
Benötigte Zeit: 00:00:01
--------------------------
Vielen Dank für den Einsatz von
AntiVir.
Arktur:/ #
Um den Scan von /home nicht zu lange dauern zu lassen, kann man
antivir /home -s -z --allfiles
--exclude=/home/adm --exclude=/home/www
benutzen. Alle Optionen erhält man mit antivir --help.
Man kann nun auch den Wächter starten und dann mal probieren, ob man
noch infizierte Files kopieren kann:
Arktur:/ # avguard start
Starting AntiVir:
avguard-serverWarning: the file "antivir.vdf" is more than 14 days old
.
Arktur:/ # cp /virus/*.*
/home/virus
cp: reguläre Datei
»/home/virus/attrinf.exe« kann nicht angelegt werden: Die Operation ist
nicht erlaubt
cp: reguläre Datei
»/home/virus/attrinf.~xe« kann nicht angelegt werden: Die Operation ist
nicht erlaubt
cp: reguläre Datei
»/home/virus/stoned.com« kann nicht angelegt werden: Die Operation ist
nicht erlaubt
cp: reguläre Datei
»/home/virus/stoned.vir« kann nicht angelegt werden: Die Operation ist
nicht erlaubt
cp: reguläre Datei
»/home/virus/tequila.com« kann nicht angelegt werden: Die Operation ist
nicht erlaubt
cp: reguläre Datei
»/home/virus/tequila.vir« kann nicht angelegt werden: Die Operation ist
nicht erlaubt
cp: reguläre Datei
»/home/virus/vacsina.com« kann nicht angelegt werden: Die Operation ist
nicht erlaubt
cp: reguläre Datei
»/home/virus/vacsina.vir« kann nicht angelegt werden: Die Operation ist
nicht erlaubt
cp: reguläre Datei
»/home/virus/yankee.exe« kann nicht angelegt werden: Die Operation ist
nicht erlaubt
cp: reguläre Datei
»/home/virus/yankee.vir« kann nicht angelegt werden: Die Operation ist
nicht erlaubt
Arktur:/ #
Mit Viren geht nun nix mehr!
Ein Update bekommt man mit
antivir --update
oder man startet den Internetupdater.
In den Optionen von Antivir kann man auch die vorhandenen Dateien in
eine CRC-Datenbank aufnehmen - das dürfte dann, auf die
Systemverzeichnisse angewendet, auch vor rootkits schützen.
Da man Ordner aus dem Scanvorgang ausnehmen kann, mehrere Ordner
einschließen kann, per E-Mail informiert wird,
es automatsiche Updates gibt u.s.w. ist Antivir in der Serverversion im
Vergleich zu den anderen von mir installierten Programmen schon zu
empfehlen. Aber auf Grund der Kosten wird es für meine Schule wohl
leider nicht in Frage kommen.
Eine Alternative wäre noch die Vexira- (oder Antivir) Linux-Workstation
Version. Es wurde bei Vexira-Workstation die gleiche
Installationsroutine aufgerufen, wie bei der Server-Version von
Antivir. Es stehen also auch der Wächter und der Updater neben dem
Komandozeilenscanner zur Verfügung. Aber darf man das?
Aufruf:
Hilfe:
Programm:
Siganturen:
Update
|
antivir [Optionen]
[Pfad]
antivir --help
/usr/lib/AntiVir
/usr/lib/AntiVir
antivir --update
|
vexira [Optionen] [Pfad]
vexira --help
/usr/lib/Vexira
/usr/lib/Vexira
vexira --update |
McAfee
VirusScan(R) für UNIX von McAfee - lief bei mir mit Arktur 4beta29a
nicht.
Laden Sie sich vlnx432e.tar.Z
(oder neuer) herunter und kopieren
Sie sie nach T:
dann:
Arktur:/home/tmp # zcat
vlnx432e.tar.Z | tar -xf -
Arktur:/home/tmp #
./install-uvscan
Which directory do you want to
install into? [/usr/local/uvscan]
/usr/local/uvscan doesn't exist.
Create it? [y]/n
Do you want to create the link(s)
to uvscan in /usr/local/bin [y]/n
Do you want to create the link(s)
to uvscan_secure in /usr/local/bin [y]/n
Do you want to create the link(s)
to liblnxfv.so.4 in /usr/local/lib [y]/n
Do you want to create the link(s)
to uvscan.1 in /usr/local/man/man1 [y]/n
Installation complete.
Do you want to perform a scan of
all filesystems y/[n] y
./uvscan: error while loading
shared libraries: libstdc++.so.2.8: cannot open shared object file: No
such file or directory
Auf Arktur 4beta29a ist diese Datei nicht zu finden. McAfee gibt in
seiner Readme die Lauffähigkeit für folgende Linux-Versionen an:
- Linux for Intel (32-bit) 2.0, 2.2 and 2.4 production kernels
with libc6 (glibc) and the stdc++ library version 2.8, as present in
older Linux distributions. The forthcoming 2.6 kernel is not supported
at this time.
- Linux for Intel (32-bit) 2.0, 2.2 and 2.4 production kernels
with libc6 (glibc) and the stdc++ library version 5, as present in
newer Linux distributions, such as RedHat 9 and SuSE 8.2. The
forthcoming 2.6 kernel is not supported at this time. The product has
been optimised for Pentium 4 but is fully compatible with all Intel
Pentium processors.
Schade - die Installation war so schön einfach!
Aufruf:
Hilfe:
Programm:
Siganturen:
Update:
|
|
Symantec
Die Scan-Engine setzt eine Java Umgebung
voraus:
Both require that the Java Runtime Environment, version 1.3.1, be
installed on the server. The Java Runtime Environment includes a Java
Virtual Machine and permits the execution of programs written in the
Java programming language.
To determine whether the server already has java installed, type:
java -showversion
If the Java Runtime Environment, version 1.3.1, is not already
installed on the server, you can download it from the Sun Microsystems
Web site.
Haben Sie Java installiert, so laden Sie sich Scan_Engine_430-RedHat-1.zip
(oder neuer) herunter, die Sie auf der Seite unter Gateway und dort
Symantec AntiVirus Scan Engine finen und kopieren Sie sie nach T:
und installieren Sie es. Über einen Bericht wäre ich dankbar. Übrigens
erhalten Sie dabei (50MByte) auch die Win2000 Version. All das mit
einem Lizenz-Key für 90 Tage zum Testen.
Trend Micro
Sie können sich eine Testversion
laden. Aber laden Sie nicht die für RedHat: und versuchen Sie es nicht
auf einem alten Prozessor, denn:
Hardwarevoraussetzungen:
- Intel™ Pentium ™ II 266 MHz Prozessor oder höher
- AMD Athlon XP oder AMD Athlon MP
- 128 MB RAM oder mehr
- 25 MB Speicherplatz für das /opt-Verzeichnis sowie 8 MB
Speicherplatz für das /tmp-Verzeichnis
probiert habe ich es trotzdem:
Arktur:/home/tmp #
./SProtectLinux-1.3.RedHat.i686.bin
NOTICE: Trend Micro licenses its
products in accordance with certain terms and
conditions.
...
--Mehr--
...
Do you agree to the above license
terms? [yes or no]
yes
Installing ServerProtect for
Linux:
Unpacking...
!! Unsupported kernel version.
(Ich hatte die RedHat-Version
ausprobiert)
!! Unsupported Linux distribution.
vendor : GenuineIntel
model : Pentium
MMX
Mhz
: 167
!! Unsupported CPU model.
Memory size: 60M
!! Insufficient physical memory.
SPLX cannot be installed.
Arktur:/home/tmp #
Aber auch die SuSE-Version will nicht mit Arktur:
Begin to install ServerProtect
for Linux
Unpacking...
!! Can not verify Linux
distribution.
!! Unsupported kernel version.
./splx_suse_12_i686_1107_en.bin:
line 436: 13766 Ungültiger Maschinenbefehl $testfile $inslogfile
SPLX cannot be installed.
Arktur:/home/tmp #
Softwarevoraussetzungen:
- Linux Server:
- SuSE™ Linux 8.1, 8.2
- SuSE Linux Enterprise Server™ 8 mit UnitedLinux 1.0
- Kernel-Unterstützung:
- SuSE Linux 8.1–2.4.21-168
- SuSE Linux 8.2 –2.4.20-102
- SuSE Linux Enterprise Server 8 –2.4.19-340, 2.4.21-169
Die Freaks werden wissen, ob das hinkommt.
Aufruf:
Hilfe:
Programm:
Siganturen:
Update:
|
|
Kaspersky
Sie können sich eine Testversion
laden. In dieser ist im Wurzelverzeichnis ein Test-Lizenz-Key
enthalten. Sie entpacken die Datei (z.B. mit dem MC) und kopieren dann
den Lizenz-Key und
kav4fileservers-linux-5.0.2.0.tgz nach /home/tmp . Danach entpacken Sie
noch dieses Archiv nach /home/tmp und können, wie unten beschrieben
fortfahren:
Arktur:/home/tmp/kav4linux
# ./install.pl
Installing the package
Which directory do you want to
install the configuration files in? [/etc/kav/5.0]:Enter
The path /etc/kav/5.0 does not
exist. Would you like to create it? [yes]:Enter
Which directory do you want to
install the binary files in? [/opt/kav/bin]:Enter
The path /opt/kav/bin does not
exist. Would you like to create it? [yes]:Enter
Which directory do you want to
install the contrib files in? [/opt/kav/contrib]:Enter
The path /opt/kav/contrib does
not exist. Would you like to create it? [yes]:Enter
Which directory do you want to
install the manual files in? [/opt/kav/man]:Enter
The path /opt/kav/man does not
exist. Would you like to create it? [yes]:Enter
Webmin configuration file is not
found.
(probably webmin is not
installed, or installed into non-default location.)
Webmin (www.webmin.com) is a
web-based interface for system administration
for various Unix utilites. If you
install it, you'll be able to configure
and use Kaspersky Anti-Virus
through the web interface.
If you want to use this
functionality, but haven't installed webmin yet,
you can safely type 'cancel'
here, install webmin later and re-run this
configuration script again (or
use Webmin to install the module from directory
/opt/kav/contrib/kavfs.wbm)
If you have webmin installed in
non-default path, please enter
where webmin configuration file
located?
(type "cancel" for continue
installation without webmin). [cancel]:Enter
Kaspersky Anti-Virus requires
license keys (*.key) to work.
If you don't have any license
file, read the documentation how to get them.
Please enter directory which
contains Kaspersky Lab license key files
(type "cancel" for continue
installation without license installation.) [cancel]:/home/tmp
Installing license file
0007363A.key
******************************************************************************
Kaspersky Anti-Virus for Mail
Servers configuration completed.
Binaries were installed in
/opt/kav/bin directory
Configuration file is
/etc/kav/5.0/kav4unix.conf
We recommend to add this
directory in your PATH environment variable.
To access the man pages add the
/opt/kav/man path to the MANPATH env variable
To start using Kaspersky
Anti-Virus you should download latest AV bases;
to do this run
/opt/kav/bin/kavupdater.
Also if you're behind the proxy
and want to update from Internet, you should
set environment variables
http_proxy and/or ftp_proxy (see wget manual pages)
To enable mail server protection,
restart your mail system as written in
product documentation.
Arktur:/home/tmp/kav4linux #
Die Virensignaturen sind nicht mit im Archiv enthalten, die muss man
sich erst von der Kaspersky-Updateseite
herunterladen, oder probiert gleich den "Updater" aus. Ich habe mir das
cumulative Archiv geholt und alle enthaltenen Dateien nach /var/db/kav/5.0/kav4unix/bases
kopiert - und schon kannte ich scannen. In dem Testversions-Archiv ist
auch ein deutsches Handbuch im pdf-Format enthalten.
Das Programm lässt sich nur aus seinem Verzeichnis heraus starten!
Die Konfigurationsdatei liegt in /etc/kav/5.0
Aufruf:
Hilfe:
Programm:
Siganturen:
Update:
|
/opt/kav/bin/kavscanner [pfad]
/opt/kav/bin/kavscanner -h
/opt/kav/bin/kavscanner
/var/db/kav/5.0/kav4unix/bases
/opt/kav/bin/kavupdater
|
Sophos
Sie können sich eine Testversion
laden, nachdem Sie Ihre Kontaktdaten eingegeben haben. (Es meldet sich
dann nach ein bis zwei Wochen jemand telefonisch bei Ihnen.) Die
Downloadadresse erhalten sie per Mail. Sollten Sie mehrere Versionen
zur Evaluierung angeklickt haben, so bekommen Sie auch mehrere Links.
Für Arktur 4 habe ich linux.intel.libc6.glibc.2.2.tar.Z
genommen.
Laut Beschreibung sollen Sie in ein temporäres Verzeichnis gehen und
dann per tar entpacken:
Arktur:/tmp # tar -xvf
/home/tmp/linux.intel.libc6.glibc.2.2.tar.Z
tar: Das sieht nicht wie ein »tar«-Archiv aus.
tar: Springe zum nächsten Kopfteil.
tar: Archiv enthält veraltete Base64-Kopfteile
tar: Fehler beim Beenden, verursacht durch vorhergehende Fehler.
Da
das nicht geklappt hat, bin ich mit dem mc in das tar-File gegangen und
habe dort das Verzeichnis sav-install nach /tmp kopiert. Danch geht es
mit:
Arktur:/tmp
# cd sav-install/
Arktur:/tmp/sav-install # ./install.sh
Sophos Anti-Virus Installationsdienstprogramm [[Linux/Intel]]
Copyright (c) 1998,2003 Sophos Plc, Oxford, England
Stellen Sie sicher, dass die IDE-Dateien für diese Version jetzt nach
/usr/local/sav heruntergeladen werden.
Arktur:/tmp/sav-install #
Also habe ich noch den Inhalt der Datei 385_ides.zip (oder neuer) in das
genannte Verzeichnis kopiert. Die vielen einzelnen ide-Dateien auf der
Sophos-Seite waren identisch mit denen im letzten ZIP-File. Ob man die
anderen Sammel-ZIP-Files alle noch braucht ....
Nun kann man scannen:
Arktur:/tmp/sav-install # sweep /home/tmp
SWEEP virus detection utility
Version 3.85, September 2004 [Linux/Intel]
Includes detection for 94007 viruses, trojans and worms
Copyright (c) 1989,2004 Sophos Plc, www.sophos.com
System time 21:11:47, System date 03 September 2004
Warning: SWEEP messages loaded from default locale en_GB
IDE directory is: /usr/local/sav
Using IDE file agent-bx.ide
Using IDE file agobotme.ide
Using IDE file agobotmf.ide
Using IDE file apler-a.ide
Using IDE file apribotc.ide
Using IDE file bagle-aj.ide
Using IDE file bagle-at.ide
Using IDE file bagled-a.ide
Using IDE file banker-k.ide
Using IDE file bdoorchr.ide
Using IDE file daemonig.ide
Using IDE file dumaru-q.ide
Using IDE file forbot-e.ide
Using IDE file forbot-k.ide
Using IDE file forbot-l.ide
Using IDE file forbot-m.ide
Using IDE file iefeat-k.ide
Using IDE file leechp-a.ide
Using IDE file legmir-r.ide
Using IDE file mydoom-s.ide
Using IDE file pado-fam.ide
Using IDE file pogue.ide
Using IDE file prxdrp-a.ide
Using IDE file rbot-fc.ide
Using IDE file rbot-fv.ide
Using IDE file rbot-fy.ide
Using IDE file rbot-gf.ide
Using IDE file rbot-go.ide
Using IDE file rbot-gp.ide
Using IDE file rbot-gr.ide
Using IDE file rbot-gs.ide
Using IDE file rbot-gx.ide
Using IDE file rbot-hb.ide
Using IDE file rbot-hc.ide
Using IDE file rbot-he.ide
Using IDE file rbot-hi.ide
Using IDE file rbot-ho.ide
Using IDE file rbot-hq.ide
Using IDE file rbot-hr.ide
Using IDE file rbot-ht.ide
Using IDE file rbot-hu.ide
Using IDE file rbot-ia.ide
Using IDE file rbot-mg.ide
Using IDE file rbot-x.ide
Using IDE file saros-a.ide
Using IDE file sdbot-no.ide
Using IDE file sdbot-nq.ide
Using IDE file sdbot-nr.ide
Using IDE file sdbot-oc.ide
Using IDE file tzet-b.ide
Using IDE file winfluxb.ide
Using IDE file wort-a.ide
Using IDE file wukill-c.ide
Using IDE file lovgatew.ide
Quick Sweeping
1 file swept in 19 seconds.
No viruses were discovered.
End of Sweep.
Arktur:/tmp/sav-install #
Einen Hilfetext bekommt man mit sweep -h und sieht dann auch die
Voreinstellungen. Diese kann man ändern. Hinweise dazu gibt es in den
deutschen Readme-Dateien im Installationsverzeichnis.
Zum scannen aller Archive nutzt man -archive
:
Arktur:/tmp/sav-install
# sweep -archive /home/tmp
SWEEP virus detection utility
Version 3.85, September 2004 [Linux/Intel]
Includes detection for 94007 viruses, trojans and worms
Copyright (c) 1989,2004 Sophos Plc, www.sophos.com
System time 21:13:35, System date 03 September 2004
Command line qualifiers are: -archive
Warning: SWEEP messages loaded from default locale en_GB
IDE directory is: /usr/local/sav
Using IDE file agent-bx.ide
... und die weiteren Meldungen ...
Using IDE file lovgatew.ide
Quick Sweeping
3 files swept in 8 minutes and 49 seconds.
No viruses were discovered.
End of Sweep.
Arktur:/tmp/sav-install #
Dauert also ziemlich lang.
Aufruf:
Hilfe:
Programm:
Siganturen:
Update:
|
sweep [optionen] [pfad]
sweep-h
/usr/local/bin
/usr/local/sav
manuell
per Download bzw. monatlicher CD
|
Avast
Laden Sie sich Avast4Linux von Alwil-Software herunter und
fordern Sie einen Lizenzkey an. Kopieren Sie danach
avast4linux-1.0.6-i386.tar.gz oder neuer nach T:
Ich bin dann mit dem mc in das Archiv gegangen und habe das
Installationsverzeichnis in die Wurzel kopiert.
Installationsverlauf:
Arktur:/avast4linux-1.0.6 # ./install.sh
avast!4 engine library 'libavastengine.so.4.1.10' is not installed!
Run './libavastengine-4.1.10/install_so.sh' script to install it!
Arktur:/avast4linux-1.0.6 # clear
Arktur:/avast4linux-1.0.6 # ./install.sh
avast!4 engine library 'libavastengine.so.4.1.10' is not installed!
Run './libavastengine-4.1.10/install_so.sh' script to install it!
Na
gut! also:
Arktur:/avast4linux-1.0.6 # ./libavastengine-4.1.10/install_so.sh
Copyright(C) 2003-2004 ALWIL Software. All rights reserved.
libavastengine.so.4.1.10 for Linux will be installed on this machine.
Technical support is available at:
http://www.avast.com/eng/support/technical_support.html
To install 'libavastengine.so.4.1.10' library now, press ENTER.
To cancel the installation at any time, press Control-C.
Checking for previous libavastengine.so installation
In which directory do you want to install 'libavastengine.so.4.1.10'
library?
[ /usr/lib ]
In which directory do you want to install shared files?
[ /var/lib/avast4 ]
Creating avast! engine configurarion file in /etc directory
Do you want to install avast! VPS updater?
[ yes ]
The library installation complete.
***NOTE***: the installation package does not contain any license file.
The program will not work without a license file. A valid license file
(with either a DEMO or a RELEASE license) _must_ be supplied.
To request a DEMO license, please visit the following web page:
http://www.avast.com/i_kat_340.php?lang=ENG
Und nun nochmal:
Arktur:/avast4linux-1.0.6 # ./install.sh
Copyright(C) 2003-2004 ALWIL Software. All rights reserved.
avast!4 for Linux will be installed on this machine.
Technical support is available at:
http://www.avast.com/eng/support/technical_support.html
To install 'avast!4' now, press ENTER.
To cancel the installation at any time, press Control-C.
In which directory do you want to install the avast! command-line
scanner?
[ /usr/bin ]
In which directory do you want to install the avast! daemon?
[ /usr/sbin ]
In which directory do you want to install the avastrelay?
[ /usr/sbin ]
In which directory do you want to install the avastguard?
[ /usr/sbin ]
Installation completed succesfully.
Arktur:/avast4linux-1.0.6 #
Arktur:/avast4linux-1.0.6 #
Nun kopiert man noch das Lizenzfile License.dat nach /var/lib/avast4
und dann kann es losgehen!
AArktur:/usr/bin
# avast -r=/var/log/avast.log /home/tmp
/home/tmp/385_ides.zip [OK]
Archived /home/tmp/385_ides.zip/rbot-ia.ide [OK]
...
und viele weitere [OK] Meldungen
...
Archived
/home/tmp/avast4linux-1.0.6-i386.tar.gz/avast4linux-1.0.6-i386.tar/avast4linux-1.0.6/avastd_interface.txt
[OK]
Archived
/home/tmp/avast4linux-1.0.6-i386.tar.gz/avast4linux-1.0.6-i386.tar
[OK]
/home/tmp/License.dat [OK]
#
# Statistics:
#
# scanned files: 148
# scanned directories: 1
# infected files: 0
# total file size: 25.0 MB
# virus database: 0429-0 12.07.2004
# test elapsed: 2s 431ms
#
Arktur:/usr/bin #
Ein permanenter Wächter ist neben einem E-Mail-Scanner auch enthalten!
Aufruf:
Hilfe:
Programm:
Siganturen:
Update:
|
avast [optionen] [pfad]
avast -h
/usr/bin
/var/lib/avast4
per script: /etc/cron.daily/avastvpsupdate.pl
|
crontab-Eintrag
Die crontab ändert man mit crontab -e: